Just a quick one for future reference:
To exlcude a model from a step in a task sequence use the following syntax:
SELECT * From Win32_ComputerSystem WHERE NOT Model Like "%Model%"
slightly different to what you would expect and may catch you out ;)
Cheers
Monday 23 April 2012
Tuesday 17 April 2012
Config Manager 2012 Debug options
Launch the config manager 2012 console with the parameter sms:debugview to get the hidden "tools" menu that allows you to view WMI namespaces :)
Monday 9 April 2012
Microsoft UE-V (User Experience Virtualisation)
Loving the granularity of the template files in UE-V! :o)
http://technet.microsoft.com/en-us/windows/hh925634
http://technet.microsoft.com/en-us/windows/hh925634
Sunday 8 April 2012
Flashing your NSA310 with Debian Squeeze to run Sabnzbd, Sickbeard & CouchPotato - Part 2
Welcome to Part 2 of this blog post, if you missed part 1 here is the link:
http://ixrv.blogspot.co.uk/2012/04/flashing-your-nsa310-with-debian.html
Otherwise lets get started.
You Will Need:
* A working USB to TTL Converter (See part 1)
* A USB flash drive formatted with the FAT16 Filesystem (I tried 3 USB drives before I found one that works so bear this in mind)
* Your linux image and Ramdisk files
* A suitable size hard disk to use for your NAS
NOTE: I initially tried a 2TB Samsung HD203WI which didnt work but my Samsung HD103UJ did work.
First visit this link and download the 2 files uImage & Debian Installation Ramdisk:
http://forum.nas-central.org/viewtopic.php?f=249&t=5145
Now format your USB flash drive to FAT16 and drop the 2 files on there, make note of what you called them as you will need to reference them shortly. I left mine as the default uImage-3.2 and initrd.gz and they were fine.
Now:
1) Insert your USB drive into the back of your NAS
2) Connect your USB to TTL Cable to the serial header
3) Insert your hard disk into the NAS
4) if you haven't already done so, fire up putty with the following settings and power on your NAS
5) Power on your NAS and when uBoot fires up and says "Hit Any key to stop autoboot" then do just that
6) now type the following:
setenv mainlineLinux yes
setenv arcNumber 4022
saveenv
reset
7) Once reset stop the boot process again and this type type:
usb start
fatload usb 0 0x800000 uImage-3.2
fatload usb 0 0xb00000 initrd.gz
set env bootargs 'console=ttyS0,115200 root=/dev/ram initrd=0xb00000,0x900000 ramdisk=32768'
bootm 0x800000
What we have basically done here is start the USB bus, load up the linux image and ramdisk to seperate memory addresses, set some boot arguments to use the ramdisk as the root and then boot from the linux image in memory
If you get disconnected dont worry! just reconnect :)
Now with any luck Linux will begin to boot, if it doesn't then try using another hard drive
8) Follow the linux install through setting your hostname, configuring your domain name etc up until you get to the remote installation password, Set this password and confirm it then close your console window.
9) Open putty again and connect via SSH to the IP address/hostname you set on your NAS.
10) you will now see the following:
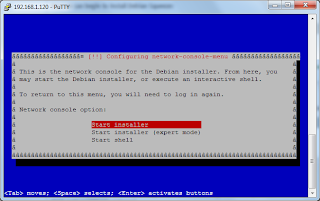
* Choose "Start Installer"
* Select Debian Archive mirror country (The country you are in or nearest to is usally best)
* Select Debian Archive mirror
* Enter proxy details if applicable
* It will then say "No Kernel Modules Found", click ignore and continue
* It will then download some additional components which shouldnt take too long
* Set your location
* Set the root password
* Setup a user account and password
* It will then load a few more components and you will see this:
11)
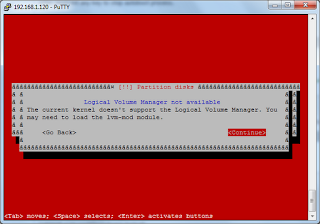 Press continue and then you will see:
12)
 If you don't then hit escape and execute a shell from the menu and type the following commands:
mknod /dev/sda b 8 0
mknod /dev/sd1 b 8 1
mknod /dev/sd2 b 8 2
13) All being well you will be asked which partitioning scheme to use:
 I selected the top option "all files in one partition", you will then be asked to confirm:
 Select finish partitioning and write changes to disk and then yes to the warning, now depending on the size of the disk this may take a while, you will also see this screen:
 this is fine, just let it do its thing....
14) Now at some point you will be asked to participate in package survey:
 this bit is up to you, choose yes/no
15) Now we come to the good bit, choosing what we want our little box of tricks to do for us:
 I chose only File Server & SSH Server, that will be enough to run Sab,SB & CP, again I will leave it up to you
16) Next it will ask you to configure your workgroup/domain and warn you that no boot loader is installed which is fine and then it will finish off the installation:

once it is done you will get:

Dont worry! that's fine, now onto part 3.... verifying the installation and flashing to the NAND :-O
Seriously though, it is easy and if you screw up then uBoot is here to save you, you just have to do the whole of part 2 again :P
Part 3
http://ixrv.blogspot.co.uk/2012/04/flashing-your-nsa310-with-debian.html
Otherwise lets get started.
You Will Need:
* A working USB to TTL Converter (See part 1)
* A USB flash drive formatted with the FAT16 Filesystem (I tried 3 USB drives before I found one that works so bear this in mind)
* Your linux image and Ramdisk files
* A suitable size hard disk to use for your NAS
NOTE: I initially tried a 2TB Samsung HD203WI which didnt work but my Samsung HD103UJ did work.
First visit this link and download the 2 files uImage & Debian Installation Ramdisk:
http://forum.nas-central.org/viewtopic.php?f=249&t=5145
Now format your USB flash drive to FAT16 and drop the 2 files on there, make note of what you called them as you will need to reference them shortly. I left mine as the default uImage-3.2 and initrd.gz and they were fine.
Now:
1) Insert your USB drive into the back of your NAS
2) Connect your USB to TTL Cable to the serial header
3) Insert your hard disk into the NAS
4) if you haven't already done so, fire up putty with the following settings and power on your NAS
 |
| Dont forget to change your COM port to the correct one! |
5) Power on your NAS and when uBoot fires up and says "Hit Any key to stop autoboot" then do just that
6) now type the following:
setenv mainlineLinux yes
setenv arcNumber 4022
saveenv
reset
7) Once reset stop the boot process again and this type type:
usb start
fatload usb 0 0x800000 uImage-3.2
fatload usb 0 0xb00000 initrd.gz
set env bootargs 'console=ttyS0,115200 root=/dev/ram initrd=0xb00000,0x900000 ramdisk=32768'
bootm 0x800000
What we have basically done here is start the USB bus, load up the linux image and ramdisk to seperate memory addresses, set some boot arguments to use the ramdisk as the root and then boot from the linux image in memory
If you get disconnected dont worry! just reconnect :)
Now with any luck Linux will begin to boot, if it doesn't then try using another hard drive
8) Follow the linux install through setting your hostname, configuring your domain name etc up until you get to the remote installation password, Set this password and confirm it then close your console window.
9) Open putty again and connect via SSH to the IP address/hostname you set on your NAS.
10) you will now see the following:

* Choose "Start Installer"
* Select Debian Archive mirror country (The country you are in or nearest to is usally best)
* Select Debian Archive mirror
* Enter proxy details if applicable
* It will then say "No Kernel Modules Found", click ignore and continue
* It will then download some additional components which shouldnt take too long
* Set your location
* Set the root password
* Setup a user account and password
* It will then load a few more components and you will see this:
11)

12)

mknod /dev/sda b 8 0
mknod /dev/sd1 b 8 1
mknod /dev/sd2 b 8 2
13) All being well you will be asked which partitioning scheme to use:


14) Now at some point you will be asked to participate in package survey:

15) Now we come to the good bit, choosing what we want our little box of tricks to do for us:

16) Next it will ask you to configure your workgroup/domain and warn you that no boot loader is installed which is fine and then it will finish off the installation:

once it is done you will get:

Seriously though, it is easy and if you screw up then uBoot is here to save you, you just have to do the whole of part 2 again :P
Part 3
Friday 6 April 2012
Important SQL information for Config Mgr 2012
For my reference and anyone else who stumbles across this:
http://scug.be/blogs/sccm/archive/2012/02/28/important-sql-information-for-configmgr-2012.aspx
As the title says very important information contained within
http://scug.be/blogs/sccm/archive/2012/02/28/important-sql-information-for-configmgr-2012.aspx
As the title says very important information contained within
Microsoft Security Compliance Manager
Microsoft have just released a new solution accelerator that looks to be very handy when used in conjunction with SCCM's desired configuration management, link below:
Thursday 5 April 2012
Flashing your NSA310 with Debian Squeeze to run Sabnzbd, Sickbeard & CouchPotato - Part 1
I bought this NAS for only £30 and although very good value was not impressed with the Zyxel branding and processes needlessly running on my little box, plus the fact that I had trouble with FFP and couldn't get a lot of apps and their dependencies running easily so I decided to be a little more creative and use the hardware I had just bought to run exactly what I wanted and only what I wanted.... so here is the "how to" on running a virgin Debian squeeze install on your NSA310 along with Sab,SB and CP, enjoy ;)
I am a windows man and this was my first real experience with linux so this guide is going to be very simple so that I or anyone else can follow along without too much knowledge of whats going on (but hopefully you will understand packages, repos and a few other bits by the time this multi-part blog is over) anyway here without further ado is part 1...
Part 1 - Creating a USB to TTL converter
You will need:
* An old Nokia cable, model DKU-5 (eBay is your friend here)
* A soldering iron (and basic soldering skills)
* Solder
* Electrical Tape
* A multimeter
* A screwdriver (Flat & Philips)
The first thing you need to do is cut the end off your cable (Not the USB end!!), this should expose a total of 5 wires, which you will need to strip the ends off.
Next use your multimeter to test the voltages and discover the GND (Ground/negative), TX(send) and RX (Recieve)
The values:
GND - no reading and should always be the black wire
TX - 2.22v (dc)
RX - 3.11v (dc)
With any luck you could buy the exact same clone cable from eBay that I did and the wires may end up being the same colours ;)
Then connect them to your Serial header as shown in the 2 pictures below:
DONT FORGET! make sure you cover the board around the pins in electrical insulation tape, you don't want a wire to accidentally touch the motherboard and short something out.


I am a windows man and this was my first real experience with linux so this guide is going to be very simple so that I or anyone else can follow along without too much knowledge of whats going on (but hopefully you will understand packages, repos and a few other bits by the time this multi-part blog is over) anyway here without further ado is part 1...
Part 1 - Creating a USB to TTL converter
You will need:
* An old Nokia cable, model DKU-5 (eBay is your friend here)
* A soldering iron (and basic soldering skills)
* Solder
* Electrical Tape
* A multimeter
* A screwdriver (Flat & Philips)
The first thing you need to do is cut the end off your cable (Not the USB end!!), this should expose a total of 5 wires, which you will need to strip the ends off.
Next use your multimeter to test the voltages and discover the GND (Ground/negative), TX(send) and RX (Recieve)
The values:
GND - no reading and should always be the black wire
TX - 2.22v (dc)
RX - 3.11v (dc)
With any luck you could buy the exact same clone cable from eBay that I did and the wires may end up being the same colours ;)
Then connect them to your Serial header as shown in the 2 pictures below:
 |
| The whole board showing the location of the serial header |
 |
| Close up showing wires, complete with labels |
Now when you connect the cable to your machine you will see it shows up as a COM port in device manager, right click on it, choose properties and set as follows:

Next you need to fire up putty (download below)
and open your serial connection with following settings:

Then power on your NAS with your serial cable attached and with any luck you should see something similar to this (If you don't try swapping TX & RX)

Then power on your NAS with your serial cable attached and with any luck you should see something similar to this (If you don't try swapping TX & RX)

This is uBoot, as you can see it says hit any key to stop autoboot, if you miss it then the zyxel image will load from NAND and you must reboot the NAS, but if you stop the boot process you now have control of the little box you see before you!!!
Part 2 will demonstrate how to load a linux image from USB and begin the installation.
Subscribe to:
Posts (Atom)